Toyota 86, GR86, BRZ, FRS, Coilover Install Instructions
Welcome to the Toyota 86 coilover install instructions guide. This detailed walkthrough will provide step-by-step instructions to ensure a smooth and successful installation. We’ve included the recommended tools, precise torque specs straight from the manufacturer, and other essential tips to help you along the way. This guide focuses on the Function and Form Type 2 Coilover kit but will also work with our Type 3, and Type 4 coilover systems, which is designed to fit all FR-S, BRZ, Toyota 86, and GR86 models. For reference, our test vehicle featured 215/45/17 tires. After installation, we recommend scheduling an alignment about a week later to allow time for the suspension to settle and achieve optimal performance. There is a link to a video at the bottom of this post if you would like to watch it instead.
Before jumping into the install, let’s take a moment to appreciate the unique history of the Toyota 86. Originally launched in 2012 as part of a collaboration between Toyota and Subaru, the Toyota 86—along with its siblings, the Subaru BRZ and Scion FR-S—quickly gained a reputation as a driver’s car. Designed with lightweight agility and balanced handling in mind, the 86 featured a low center of gravity, thanks to its flat-four boxer engine, and a suspension setup tailored for precision and responsiveness. With its focus on delivering pure driving enjoyment, the Toyota 86 became a favorite among enthusiasts for both its performance and its tunability. Upgrading to Function and Form Type 2 Coilovers is an excellent way to take this platform to the next level, enhancing its cornering capabilities, fine-tuning its stance, and making it an even more engaging car to drive.
TOOLS NEEDED
Sockets: 19mm, 17mm, 14mm, 12mm, 10mm.
Wrenches: 19mm, 17mm.
Impact wrench.
Ratchet.
Spanner wrenches (provided with kit).
Trim removal tool.
Floor jack.
Flashlight (optional).
Before starting the installation, measure the distance from the center of the wheel to the fender for both the front and rear.
Decide how much you would like to lower the vehicle, and record those measurements.
Measurements before install:
Front: 14.25″
Rear: 14.75″
Goal:
Front: 13.25″
Rear: 13.25″
Properly jack up the vehicle using the designated lift points.
Remove the wheels using a 19mm socket.
Detach the brake line bracket using a trim removal tool and a 12mm.
Take out the wheel speed sensor with a 10mm socket.
Loosen the endlink using a 17mm socket and a 6mm hex key.
Use a 19mm socket and wrench to remove the strut lower mount bolts.
Remove the strut by loosening the 12mm top hat nuts.
Adjust the coilover height to the desired height, measuring from the middle of the eyelet to the top hat.
We adjusted our front coilover height to 12.5 inches because the stiffer springs will not sag as much as the original springs for this vehicle, which will give us the 1-inch drop we are looking for.
Do not adjust the height using the spring perches, as they are intended to adjust spring preload only.
Click here for video on how to reset preload.
Place the front coilover into position and hand-tighten the top hat nuts. Ensure the camber plate is positioned so that it can move horizontally.
Place the camber bolt in the top mounting hole and torque the lower mount bolts to 114 lb-ft using a 19mm socket and 19mm wrench.
Torque the endlink to 34 lb-ft using a 17mm socket.
Torque the brake line to 23 lb-ft using a 12mm socket.
Torque the wheel speed sensor to 14 lb-ft using a 10mm socket.
Torque the top hat nuts to 17 lb-ft with a 12mm socket.
Use spanner wrenches to lock the lower mount into place.
Adjust the camber on the top hat using a 5mm hex key (torqued to 12 lb-ft). You can make additional camber adjustments on the top lower mount bolt.
Note that the camber bolt should be properly adjusted by an alignment shop.
Install the wheels and torque them to 89 lb-ft using a 19mm socket.
REAR INSTALLATION
Remove the wheel using an 19mm socket.
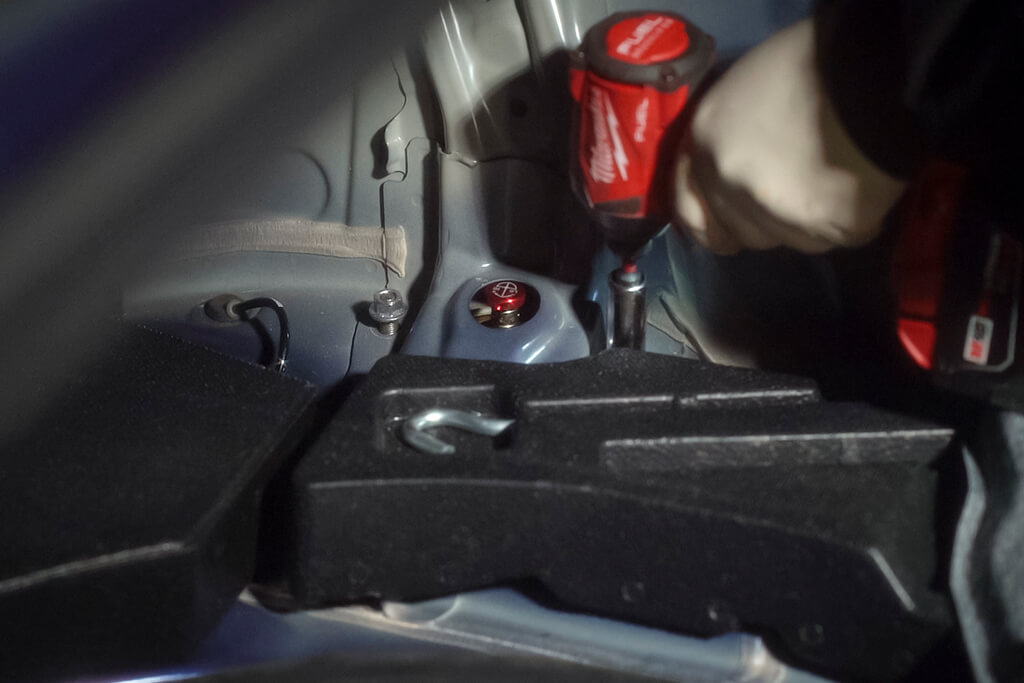
Open the trunk and remove the center side trunk lining. Then, remove the three trim hardware pieces on both sides using a trim tool to access the top hat nuts.
Loosen the top hat nuts using a 14mm socket, but do not remove them.
Support the rear lower control arms with a jack.
Remove the headlight sensor with a 10mm socket.
Then, remove the endlink bolt using a 14mm socket.
Following that, remove the strut lower mount bolt using a 17mm socket.
Loosen the spindle nut using a 17mm socket. Do not remove it.
Remove the 17mm subframe bolt and pull down the lower control arm.
Next, remove the top hat nuts with 12mm socket and then remove the strut.
Adjust the coilover to the desired height, measuring from the middle of the eyelet to the top hat. We adjusted the rear coilover height to 14.25 inches.
Install the coilover by first hand-tightening the top hat nuts.
Install the lower control arm to the subframe using a 17mm socket and torque it to 59 lb-ft.
Next, torque the lower mount bolt to 59 lb-ft using a 17mm socket.
Torque the endlink nut to 28 lb-ft using a 14mm socket.
Torque the headlight sensor to 5.5 lb-ft using a 10mm socket.
Finally, torque the spindle bolt to 59 lb-ft.
Use spanner wrenches to lock the lower mount into place.
Next, torque the top hat nuts to 17 lb-ft using a 12mm socket.
Install the wheels and torque them down to 89 lb-ft using a 19mm socket.
Adjust dampening to drivers preference than reinstall trunk lining.
This completes the Toyota 86, GR86, BRZ, FR-S coilover install instructions. We recommend performing an alignment one week after installation to allow time for the suspension to settle.
Learn about us (Click here)
Follow us on Instagram


